|
 |
Registration How-to
Entering orchids or orchid art into an orchid show is
not difficult.
The procedure we use in our society is explained below, one step at a time, and if you do want
to arrive at the show prepared, you can determine what class your plant
belongs to beforehand.
Otherwise, we will be happy to help you out at the
show itself. |
|
|
(Note that the procedure is similar in all orchid shows, but there will be
differences in the show rules, and especially, in the definition of the
classes of the plants. So be sure that you get the classification sheet
of the show you're entering, to be able to put your plants into the right
classes.) |
|
Step 1: |
|
|
Read the
 |
When you come to the show with your blooming orchids, go first to the registration desk.
There, you will be presented with the
show rules and be asked to read them and agree to them.
(you can look them
up with the link on the left) |
|
Step 2: |
|
Get an
Exhibitor Number
|
Still at the registration desk, you will sign up on the Exhibitor
List and be given an Exhibitor Number.
This number permits you to
remain anonymous, and that is especially important for the judging process
the following day. |
|
Step 3: |
|
Get one Plant
Identification Tag and one stake per plant and fill in your Exhibitor
Number
|
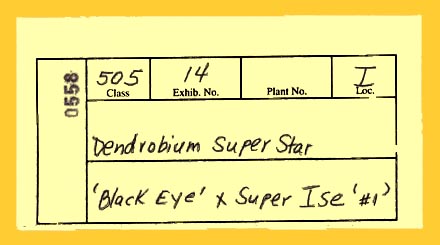
Then you will be given one Plant Identification Tag and one stake for
every plant you are exhibiting.
Immediately write down the Exhibitor Number you have been given into the
appropriate field (on our example it's number 14).
Below
is a Plant Identification Tag from last year's show as an example
|
|
Step 4: |
|
|
Find a place
on the Show Table and fill in the Location field |
Now you can look for a free space on the show table and place your plant
there. Find the nearest location tag on the show table and enter its number
into the Location field of the Plant Identification Tag
(on our example, the location is "I"). |
|
Step 5: |
|
Fill in the
plant's name and, eventually, its parentage
|
Then, copying the information off the nametag of your plant, you will write
the name of the plant you are exhibiting into the big middle field of the
Plant Identification Tag (Dendrobium Super Star in our example).
If you happen to know the parentage of your plant, you can fill in the lower
field as well ('Black Eye' x Super Ise '#1' in our example). |
|
Step 6: |
|
Find out what
alliance your plant belongs to with the

|
Now comes the most interesting part: you have to find out what alliance and
what class your
plant belongs to (there will be people to help you out with this if you have
any trouble).
To do that, you take the name of your plant again. Look up the first
part of your plant's name in the Alliance Finder provided at the
registration desk or on the link at left. (Note that the
Alliance Finder has also a section
that is organized by abbreviation, so that you'll be able to find your
plant's alliance even if its name is not written out).
In our example, the first part of the plant's name is "Dendrobium", and that is also its alliance. |
|
Step 7: |
|
Find out what
class your plant belongs to with the
 sheet and fill in the class number sheet and fill in the class number
|
Now that you know your plant's alliance, you take the Registration
Classes sheet (found also at the registration table or on the link at the
left) and read about that alliance. Comparing with your plant, decide
which class your orchid belongs to, and fill in the class number on the Plant
Identification Tag.
If you have any doubts, let people from the society help you!
In our example, the class is 505. |
|
Step 8: |
|
|
Bring the
yellow carbon copy of the Plant Identification Tag to the registration desk and
plant the white part into the pot |
Are you through? - Not quite: now comes the most important part of the whole
process: Bring the yellow carbon copy of the Plant Identification Tag to the
registration desk so that they can file the information, and plant the white
part with its stake into your plant's pot, so that everybody can read it.
|